
Learn about the ancient art of thangka paintings and how it was taught to Ngawang Jorden in Tibet.
 Ngawang Jorden explains the meanings, traditions and the art of thangka painting based on his education in Tibet.
* Thangka is used for and its meaning:
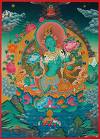
A Thangka Buddhist banner was hung in a monastery or a family altar and occasionally carried by monks in ceremonial processions.
The word thang means flat, and thus the Thangka is a kind of painting done on flat surface but which can be rolled up when not required for display, sometimes called a scroll painting.
The most common shape of a thangka is the upright rectangular form.
These thangka served as important teaching tools, depicting the life of the Buddha, various influential lamas and other deities and bodhisattva.
One popular subject is The Wheel of Life, which is a visual representation of the Abhidharma teachings (Art of Enlightenment).
These Tibetan religious paintings offer a beautiful manifestation of the divine, being both visually and mentally stimulating.
Thangka, when created properly, perform several different functions; images of deities can be used as teaching tools when depicting the life (or lives) of the Buddha, describing historical events concerning important Lamas or retelling myths associated with other deities. Religious art is used as a meditation tool to help bring one further down the path to enlightenment.
* Steps of learning to paint thangka paintings:
You need to learn to graph out the proper lines, segments, and spacing, this involves a particular type of formula that you must memorize.
There are four basic forms of deities that you must initially learn. These forms must be mastered and practiced hundreds of times until memorized and drawn perfectly.
These are: Buddha Shakyamuni (represents/ helps you with the form of a neutral position), Green Tara (basic female form), Vajrapani (basic form of a wrathful deity), Kalachakra (basic form for very complex deities).
Then you are taught how to make by hand the canvas for each thangka. It must always be done the same way. The frame is made of wood and the canvas must be stretched over it. There is a single piece of rope that is laced behind the canvas which must be pulled tightly. It is similar to what a hand made drum may look like.
* Steps of creating the thangka canvas and painting:
Next, is to make homemade "leather glue" that is mixed with powered chalk, which is then painted on top of the canvas. This helps to be some what of filler for the canvas, and then helps us create a smooth surface.
After the glue dries, it is lightly gone over with a wet rag. While the surface is still wet, you must rub the canvas on both sides with a very smooth rock, which each artist finds in some nearby river.
Due to the wetting and rubbing, the material allows the canvas to stretch; you must tighten the rope behind the material/canvas between each act. This must usually be done three times.
Finally you begin your thangka with the basic skills of measurement and forms that were the building blocks of your first few years as a thangka painting student.
When a line drawing of a specific deity is finished, color is added with water- based acrylic paint. The fine tuning of color to a perfectly painted thangka can take a minimum of five years.
There are many different techniques to painting as well, in terms of shading, brush strokes, and the specific instructions that you must follow for each deity.
Leave a comment